
You know the drill. You’re squinting at your iPhone, holding it closer, then farther away, then tilting it like that’s going to help. The text is just too small, and it’s turning something as simple as reading a text or checking an email into a mini workout for your eyes.
Figuring out how to make text bigger on iPhone should be simple, but Apple buries the best options in menus you might never think to open.
The good news is that the solution is rarely just one setting. It’s a layered approach, and once you know where everything lives, you can set your phone up so it’s truly comfortable to read in just a few minutes. As of 2026, iOS offers a surprisingly deep set of controls that go far beyond the basic slider, and most people never find them.
No matter your iPhone model, from the newest Pro to an older SE, these settings work the same way, so let’s walk through them step by step.
Quick Answer
Go to Settings > Display & Brightness > Text Size and drag the slider right. For a bigger jump, enable Settings > Accessibility > Display & Text Size > Larger Text, then move the slider to your preferred size. That’s the core fix.
It applies across most built-in Apple apps and many third-party ones. If that’s not enough, use Display Zoom in the Display & Brightness menu or adjust the text size per-app using the Control Center. Each option builds on the last.
Key Takeaways
- The standard Text Size slider is limited; enabling the “Larger Text” toggle in Accessibility unlocks much bigger fonts.
- Display Zoom makes everything bigger, including icons and UI elements, not just text.
- You can set different text sizes for different apps using the Control Center’s Text Size button.
- Bold Text is a great companion to a larger font size because it improves legibility without taking up more screen space.
- Not every app respects your system settings; you’ll need to adjust some individually.
Start Here: The System-Wide Text Size Settings You Need to Know
If you’ve already been poking around, you probably found the main Text Size slider. It’s a good start, but it’s actually the weaker of the two main options. The iPhone has two distinct ways to scale text, and they live in different places.
The first is meant for minor adjustments. The second is designed for people who genuinely need bigger fonts to read comfortably.
How to Use the Basic Text Size Slider
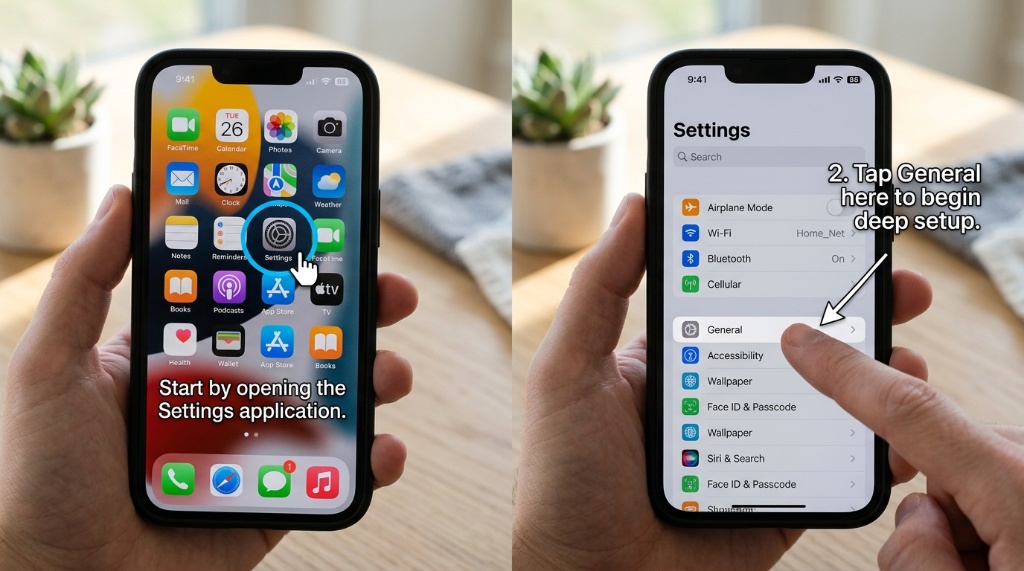
Open the Settings app on your iPhone. Scroll down and tap Display & Brightness. Right in the middle, you’ll see Text Size.
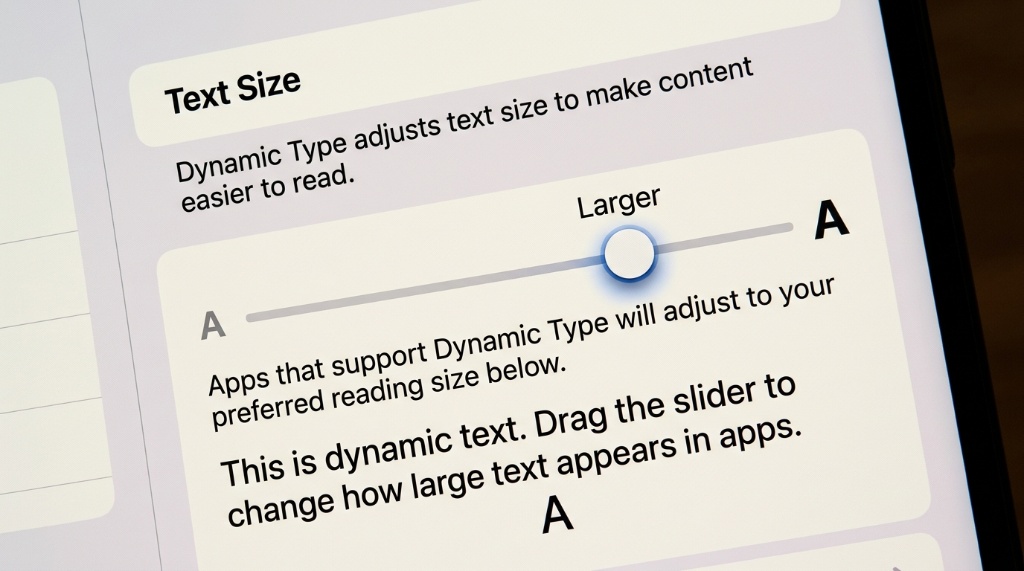
Tap it, and you’ll get a slider with a small “A” on the left and a large “A” on the right. Drag the slider to the right to make the text bigger.
But here’s the catch. That slider you just used is capped. It gives you a range of font sizes, but it doesn’t reach the truly large sizes that some people need.
It’s the “casual” adjustment, meant for people who just want a touch more size without reshaping the entire interface.
The other limitation is that this slider does not support “Dynamic Type” in the full sense. Dynamic Type is Apple’s system that lets text scale up while maintaining readability in app interfaces. The basic slider does scale text, but it’s limited in its range.
The good news is that the setting you’re about to learn next unlocks the real power.
Unlocking the Hidden “Larger Text” Accessibility Option
This is the setting that actually solves the problem for most people. Go back to the main Settings page and scroll down to Accessibility. Tap it, then tap Display & Text Size.
At the top of this menu, you’ll see Larger Text with a toggle switch.
Turn that toggle on. Boom. You’ve just unlocked a much wider range on the slider that appears right below it.
Now, as you drag the slider, you’ll notice the text can get much bigger. We’re talking sizes that would take up half the screen if you wanted. Apple designed this setting specifically for people with vision impairments, but anyone who just likes big, comfortable text can use it.
You’ll see a live preview at the top of the screen as you adjust the slider, which makes it easy to land on the perfect size.
Should You Also Turn On Bold Text?
While you’re in the Display & Brightness menu, take a look at the Bold Text toggle. It’s right above the Text Size option.
Bolding your text doesn’t make it physically larger, but it does make it heavier and easier to read. This is a huge help for people with mild vision issues or for anyone reading in bright sunlight where the screen is harder to see.
You can absolutely combine Bold Text with the larger font sizes, and in our research, most people who enable the Accessibility sizes also turn on Bold Text. Just note that it requires a respring, which is Apple’s term for a quick device restart. It takes about ten seconds, and your phone will be right back where you left it when it’s done.
What Is Display Zoom and When Should You Use It?
The settings we just covered only change the size of the text. They don’t affect the size of icons, buttons, or the other interface elements that make up the iPhone home screen. If you want everything to look bigger, you need a different tool called Display Zoom.
You’ll find this in Settings > Display & Brightness. Scroll down to the Display Zoom section and tap View. You’ll get a choice between Standard and Zoomed.
Standard vs. Zoomed Display: What Actually Changes
Here’s what’s happening under the hood. Your iPhone has a certain native resolution. In Standard mode, it uses a scaled version of that resolution to fit more content on the screen.
The text and icons are smaller, but you can see more of your apps and photos.
With Zoomed mode, the iPhone uses a different scaled resolution. It makes everything larger, from the text to the icons on your home screen to the buttons in your apps. It’s like turning on a magnifying glass for the entire operating system.
Nothing is blurry; it’s just bigger.
The Trade-Offs: Bigger Icons vs. Less Screen Real Estate
The catch with Display Zoom is that you see less on the screen. A Zoomed display is great for readability, but you’ll see fewer emails in your list, less of a webpage, and fewer rows in your calendar. It boils down to a tradeoff: comfort versus capacity.
Who is Display Zoom best for? In our research, it’s a great fit for people who have trouble seeing icons clearly or who find that the standard interface is just too dense. It’s also a good option for older users who want a more accessible experience without digging into complex accessibility menus.
Keep in mind, though, that Display Zoom is a display-level setting, not a text-level one. If you only need bigger letters but like your current layout, stick with the text settings above. If you want a wholesale change, Display Zoom is the answer.
Per-App Text Size: The Override Most People Don’t Know Exists
Here’s a scenario. You’ve set a nice, big font size system-wide, and then you open your email app, and the text looks like it belongs on a legal document. What’s going on?
That’s because some apps let you override the system setting from within the app itself. But there’s also a system-level override that lets you set a specific size for a specific app, regardless of your global settings. It’s separate from everything we’ve discussed so far.
How to Set Different Text Sizes for Different Apps
This feature is built into Control Center, and you have to enable it first. Go to Settings > Control Center. Scroll down to find Text Size (it has a small “A” icon) and tap the green plus button next to it.
Now, the Text Size control is accessible from Control Center.
Here’s how you use it. Open the app whose text size you want to change. Any app will do, whether it’s Mail, Safari, or a third-party app that supports Dynamic Type.
Then, swipe down from the top-right corner to open Control Center. You’ll see a small “A” icon. Tap it, and you’ll get a slider.
The trick is that you have two options in the menu that appears. At the bottom, you can tap “All Apps” to change the global text size, or you can tap “Mail Only” (or whatever app you’re currently in) to change just that app’s text size. When you choose the app-specific option, your iPhone saves that size for that app only.
Why Not All Apps Respect Your Settings (and What to Do About It)
This is the frustrating part. Dynamic Type is a guideline, not a hard rule. Apple’s own apps all support it.
Many popular third-party apps support it too, but some developers choose not to. When an app doesn’t support Dynamic Type, your text size settings simply won’t apply to it. The text will stay at whatever size the developer hard-coded into the app.
If you run into an app like this, open the app’s own settings or preferences menu. Many big-name apps, like Kindle, WhatsApp, and Chrome, have their own text size controls built in. If the app doesn’t have that, you’re stuck with what the developer decided, unless you use the app in Safari’s Reader View, which we’ll cover next.
Making Text Bigger in Safari, Mail, and Other Built-In Apps
Apple’s native apps generally follow your system text size settings, but they also offer their own shortcuts. These are useful when you don’t want to change the whole phone, just the app you’re reading right now.
Safari Reader View and Page Zoom
Safari is the most common place where people struggle with text size. Websites are designed with small fonts all the time.
That’s where Reader View comes in. Open a webpage in Safari. Tap the small “aA” icon in the top-left corner of the address bar.
From the dropdown menu, tap Reader View. The page will be reformatted into a clean, article-only layout with no clutter.
Once you’re in Reader View, tap the “aA” icon again, and you’ll see a new set of options. There are two “A” buttons, one on the left that’s smaller and one on the right that’s larger. Tap the larger one, and the text size of the article will increase.
You can also change the font and background color from this menu.
If you want to zoom the entire webpage rather than just the text in Reader View, tap and hold the “aA” icon instead. A pop-up will appear with a Page Zoom slider. This works like Display Zoom but just for the website you’re viewing in Safari.
The zoom applies to everything on the page, including images.
Mail’s Text Size Controls
The Mail app follows your system-wide text size settings. Dynamic Type works well in Mail, and if you’ve increased your font size in Settings, your emails should reflect that.
But there’s a catch. Some email messages are sent with fixed font sizes. This is common with marketing emails or newsletters that use HTML templates.
When that happens, your iPhone text size settings won’t affect the email’s content. The developer of the email template chose the font size, and you can’t change it from within Mail.
If you have trouble reading a particular email, try forwarding it to yourself. Sometimes that strips the fixed formatting and forces Mail to use the Dynamic Type sizes. It’s not a perfect fix, but it works more often than you’d think.
Other Native Apps That Have Their Own Settings
Messages, Notes, and Calendar all follow your system text size. That’s expected. What you might not realize is that some of them have their own font size controls.
In Notes, for example, you can change the text size of a single note by selecting the text and tapping the “Aa” button in the format menu. This doesn’t change the global Notes font size; it changes just the selected text, like a word processor.
Calendar can be tricky because it needs to fit a lot of information on one screen. If the text is too small, even after increasing it system-wide, you might need to rely on Display Zoom or hold your phone in landscape mode. Landscape mode automatically scales the Calendar view to fit more and often displays text a bit larger.
Third-Party Apps: What Works and What Doesn’t
Now we venture into the wild west of app development. Third-party apps are where text size settings get inconsistent.
Apps That Follow Dynamic Type Automatically
Many well-known apps support Dynamic Type. This means they’ll automatically adjust their text to match the size you’ve set in the Accessibility settings. Apps like Twitter (X), Reddit, Spotify, and most modern social media apps are built with Dynamic Type support.
If you’ve made your system font larger, these apps will generally show larger text without any extra effort on your part.
The key is that the developer has to explicitly build the app to respond to the system’s “Content Size Category” setting (which is the technical name for your text size setting). Apple’s Human Interface Guidelines encourage this, and most reputable developers follow along.
Popular Apps With Built-In Text Controls (e.g., Kindle, WhatsApp)
Some apps go a step further and add their own text controls, separate from the system setting. Amazon’s Kindle app has always done this. You can open any book, tap the “Aa” icon, and adjust the font size, line spacing, and margins right there.
It doesn’t matter what your iPhone’s text size is set to; the Kindle app has its own system.
WhatsApp is another one. It has a built-in text size slider under Settings > Chats > Font Size. You have three options: Small, Medium, and Large.
It’s separate from the system settings, so if WhatsApp’s text is too small, you adjust it there, even if your iPhone is already set to maximum.
This is also true for many PDF readers, note-taking apps, and code editors. If you’re using an app where reading is the primary function, there’s a good chance it has its own text size controls.
When You’re Stuck With an App That Won’t Cooperate
Here’s the worst-case scenario. You’ve maxed out your system text size, you’ve enabled the Larger Text accessibility feature, and the app still shows tiny text. What can you do?
First, check the app’s Settings page. Some apps have a “Use System Settings” or “Follow System” toggle. If you find it, make sure it’s turned on.
If there’s no built-in control and no toggle, you have a few workarounds. You can use the app in a different way, like in Safari’s Reader View if it’s a website. You can screenshot the text and zoom into the screenshot.
That’s a clunky fix, but it works in a pinch.
Your last option is to leave feedback asking the developer to add Dynamic Type support. App developers listen to user feedback, and accessibility requests are taken seriously. It’s a slow fix, but it’s the only real one for apps that outright refuse to follow your system settings.
Third-Party Apps: What Works and What Doesn’t
Now we venture into the wild west of app development. Third-party apps are where text size settings get inconsistent. Some apps follow your system settings perfectly.
Others ignore them entirely and force you to dig through their own menus.
Apps That Follow Dynamic Type Automatically
Many well-known apps support Dynamic Type. This means they’ll automatically adjust their text to match the size you’ve set in the Accessibility settings. Apps like Twitter (X), Reddit, Spotify, and most modern social media apps are built with Dynamic Type support.
If you’ve made your system font larger, these apps will generally show larger text without any extra effort on your part.
The key is that the developer has to explicitly build the app to respond to the system’s “Content Size Category” setting. That’s the technical name for your text size setting. Apple’s Human Interface Guidelines encourage this behavior, and most reputable developers follow along.
Popular Apps With Built-In Text Controls (e.g., Kindle, WhatsApp)
Some apps go a step further and add their own text controls, separate from the system setting. Amazon’s Kindle app has always done this. You can open any book, tap the “Aa” icon, and adjust the font size, line spacing, and margins right there.
It doesn’t matter what your iPhone’s text size is set to; the Kindle app has its own system.
WhatsApp is another one. It has a built-in text size slider under Settings > Chats > Font Size. You have three options: Small, Medium, and Large.
It’s separate from the system settings, so if WhatsApp’s text is too small, you adjust it there, even if your iPhone is already set to maximum.
This is also true for many PDF readers, note-taking apps, and code editors. If you’re using an app where reading is the primary function, there’s a good chance it has its own text size controls.
When You’re Stuck With an App That Won’t Cooperate
Here’s the worst-case scenario. You’ve maxed out your system text size, you’ve enabled the Larger Text accessibility feature, and the app still shows tiny text. What can you do?
First, check the app’s Settings page. Some apps have a “Use System Settings” or “Follow System” toggle. If you find it, make sure it’s turned on.
If there’s no built-in control and no toggle, you have a few workarounds. You can use the app in a different way, like in Safari’s Reader View if it’s a website. You can screenshot the text and zoom into the screenshot.
That’s a clunky fix, but it works in a pinch.
Your last option is to leave feedback asking the developer to add Dynamic Type support. App developers listen to user feedback, and accessibility requests are taken seriously. It’s a slow fix, but it’s the only real one for apps that outright refuse to follow your system settings.
Common Mistakes to Avoid When Adjusting iPhone Text Size
You’d think it’s simple, but there are a few traps that trip people up. Avoid these, and you’ll save yourself a lot of frustration.
Mistake #1: Only Adjusting the Slider Without Enabling Larger Text
This is the most common one. You slide the Text Size bar all the way to the right, and it’s just not big enough. So you assume your iPhone can’t do any better.
That’s wrong. The basic slider is intentionally limited. It’s designed to reach sizes that are comfortable for most people without breaking app layouts.
The truly large sizes are locked behind the “Larger Text” toggle in Accessibility. If you haven’t turned that on, you’re stuck at the basic range. Go turn it on, and the slider will suddenly give you much more range.
Mistake #2: Confusing Display Zoom With Text Size
Display Zoom changes the resolution of your screen, not just the font size. It makes everything bigger. This seems like a great idea until you realize that it also makes everything take up more space.
You’ll see fewer emails in your inbox, less of a webpage, and smaller keyboard buttons might actually be harder to hit.
If you only need bigger letters, stick with the text size sliders. Display Zoom is a sledgehammer. Text Size is a scalpel.
Use the right tool for the job.
Mistake #3: Assuming Changes Apply to Every App
We touched on this earlier, but it’s worth repeating. Not every app respects your system text size setting. Some apps have their own controls.
Some apps don’t support Dynamic Type at all.
If you change your text size and then open an app that still looks small, don’t panic. Your phone isn’t broken. Check the app’s settings for its own text controls.
If there are none, you’ve found an app that doesn’t support Dynamic Type, and your workarounds are limited.
Frequently Asked Questions
Why is my iPhone text still small after I increased the text size?
The most likely reason is that the app you’re using doesn’t support Dynamic Type. Many third-party apps have their own font settings, or they simply ignore your system preferences. Check the app’s settings menu for its own text controls.
If none exist, try using the app in Safari’s Reader View if it’s a website. Your system text size only applies to apps that are built to respond to it.
Does Bold Text use more battery?
No, Bold Text does not use more battery. It’s a rendering choice that makes fonts heavier and darker. On OLED screens, it might actually use slightly less power, since black pixels are turned off.
On LCD screens, there’s no measurable difference. You can enable Bold Text without worrying about battery life.
What’s the biggest text size I can get on an iPhone?
With the “Larger Text” accessibility feature enabled, you can scale text up to a maximum of about 53 points. That’s roughly 310% of the default size. For context, the standard Text Size slider maxes out around 20 points.
At max accessibility size, a single character can take up a significant portion of your screen width.
Does changing text size affect all apps equally?
No, it does not. Apple’s native apps generally respond well to system-wide text changes. Third-party apps vary.
Apps that support Dynamic Type will scale their text automatically. Apps with their own settings will use those instead. Apps without any support will ignore your system preferences entirely.
Will my text size settings sync to my other Apple devices?
Yes, if you have iCloud sync enabled for your settings. Go to Settings > Your Name > iCloud, and make sure “Sync this iPhone” is turned on. Your text size preferences will carry over to your iPad and iPod touch.
They do not sync to the Apple Watch, which has its own, simpler text size controls.
Final Verdict: The Best Setup for Your Eyes (A Quick Decision Guide)
There’s no single “right” answer here. The best setup depends on how much help your eyes need and what you value more: readability or screen space.
If you just want a bit more comfort, start with the basic Text Size slider in Display & Brightness. That’s enough for most people. If that’s not cutting it, enable the Larger Text toggle in Accessibility and push the slider further up.
Add Bold Text for extra legibility without sacrificing screen real estate.
If you want everything bigger, not just text, switch to Display Zoom. Just remember you’ll see less content on screen. For specific apps that stubbornly refuse to cooperate, use the Control Center’s per-app text override or the app’s own settings.
Here’s a quick breakdown:
| Your Situation | Best Solution |
|---|---|
| Mild discomfort reading small fonts | Basic Text Size slider |
| Need significantly larger fonts | Accessibility > Larger Text |
| Icons and buttons are too small | Display Zoom |
| Just one app is hard to read | Per-app override in Control Center |
| Websites are unreadable | Safari Reader View with its own text controls |
| App ignores your system settings | App’s built-in font settings, or feedback to developer |
Start with the smallest change that fixes your problem. You can always layer more solutions on top if you need them. Your eyes will thank you.